
In this article, we’ll guide you to create your first multi-page form in your WordPress blog or website without writing a single line of code.
What is a Multi-Page Forms?
It’s just breaking your long forms into multiple pages/ steps so that users will be seeing only a few simple questions so that the conversion can be improved. And the beautiful benefit or multi-pages forms is, you can use conditional logics to show different questions based on their previous answers.
Excited? Let’s see how we can create your first multi-step WordPress form
How to Create Multi-Step WordPress Form
Video Guide

Step-by-Step Guide
Step 1: Create your form in WordPress
The first step is to create your WordPress form using a form builder. We need to choose a builder which supports multi-page feature for this step.
In this example, we’re using a WordPress form builder- WPForms which is the best WordPress form builder in market.
So, let’s install and activate WPForm builder.
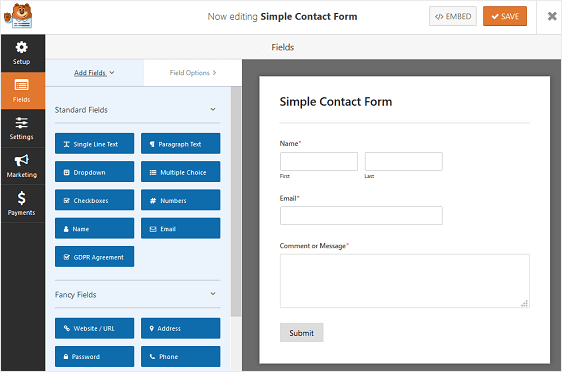
Next, go to WPForms » Add New in your WordPress dashboard to create a new form.
Name the form on setup screen and choose a template. Here we’re choosing a simple template.


you can start building your form by choosing a template and adding additional questions (we’ll convert this long form into multi-step form later) in fields section.

Needs to accept payments on your WordPress form? Learn more.
Step 2: Split Your Form into Multi-Steps
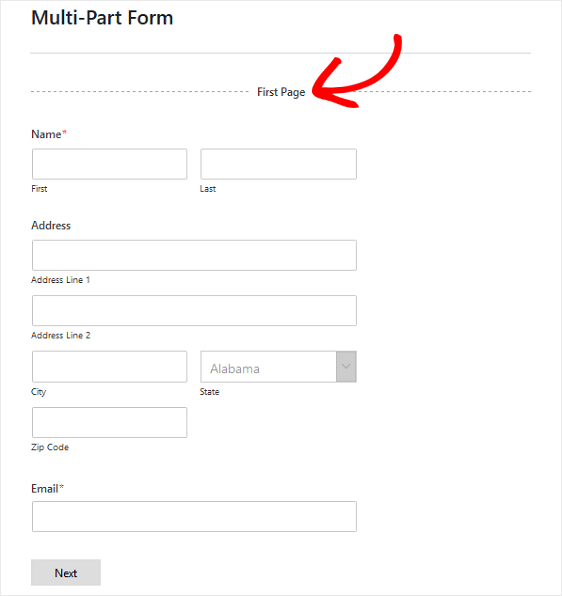
Once your form is ready with fields, you need to add the Page Break form field to where you need to split your form.
To do this, you can just drag the Page Break form field in Fancy Fields section and drop to in between your form (see the image below).


Repeat this step to split your form as much as you need. WPForms will write the complex codes on behalf of you to make the multi-pages form functional.
Step 3: Customize the Progress Bar on Your WordPress Form
It is recommended to add a progress bar as well on your forms to let your prospects know different sections of your form.
Using a process bar, they’ll know where they are on your WordPress form and how much they have to fill to complete form– This is important for improving conversion rate. To make this super easy for you, WPForms has built-in breadcrumb bars as below:


You can easily customize progress bars and page titles by simply clicking on each page break fields.

You’ll see be below customization options:


Then click on the ‘Next‘ button, and you can customize the button and title of next page.


On this page, you can click on the ‘Previous‘ button and customize it as well.


Click Save once your complete customizing all your pages and buttons.
Step 4: Configure Form Settings
Now you’ve design of the form with multi-step feature enabled. The next is to configure your form settings to customize it’s behaviour and submission actions.
Go to Settings -> General


On this screen, you can configure the following:
- Form Name — Change the name of your form to identify later
- Form Description — Give your form a description
- Submit Button Text — Customize the copy on the submit button- Studies says that the conversion will be improved if you use action verbs on your button
- Spam Prevention — This section helps you to enable anti-spam protections to stop bots auto submitting on your form. You can also refer how to enable Google reCAPTCHA on your form here
- AJAX Forms — Enable AJAX settings with no page reload for improving page load speed
- GDPR Enhancements — You can disable the storing of entry information and user details, such as IP addresses and user agents. This is mandatory in EU countries
Click ‘Save‘ once you’re done!
Step 5: Configure Your Form’s Notifications
You can setup an email notification when someone submit the form.
Go to Settings -> Notifications.


Step 6: Customize Your Form’s Confirmations


On settings -> Customizations section, you can update the POST form submission confirmation action. There’re three type of confirmations are supported by WPForms:
- Message: This is the default confirmation type. A simple confirmation message will appear instead of field letting them know their submission is sent successfully. This confirmation type won’t redirect from your current page.
- Show Page: This confirmation type will show a specific page on your WordPress once the submission is successful. This type is recommended if you are planning to WordPress page itself as thank you page
- Go to URL (Redirect): Use this type if you want to redirect prospect another website after submitting the form
Step 7: Add Your Form to Your Website
Awesome!
Now your multi-step form is ready to embed on pages as per your requirements.
On the edit window of pages you can see ‘Add WPForm icon’.

Just click on it and choose the form you would like to add on that page.


Conclusion
That’s it! You’re created your multi-step form successfully.