• Skip to primary navigation
  • Skip to main content
  • Skip to primary sidebar

Technology blog

Technology Blog

  • Tech Updates
  • SEO
  • Reviews
  • Google
  • Blogging
  • Windows
  • Downloads
  • Earn-Money Online
  • Android

Wordpress

WPForms ActiveCampaign integration Guide

November 19, 2022 by Technology Blog Leave a Comment

Let’s see how WPForms ActiveCampaign integration works.

ActiveCampaign is a marketing tool that allows you to keep in touch with your customers. 

You can upscale your email marketing and other CRM services using the ActiveCampaign API.

WPForms is a contact form plugin from WordPress. 

Anyone can create these contact forms on your WordPress sites and place it on any page as per your requirements.

The process of creating this contact form is as simple as drag and drop.

ActiveCampaign when integrated with WPForms, it becomes powerful enough to take your business to the next level.

WPForms collects necessary details from the website visitors and saves them in the ActiveCampiagn database which will create a follow-up strategy for the visitor based on the details provided. 

As simple as that.

Let us see how to integrate WPFroms and ActiveCampaign through simple steps.

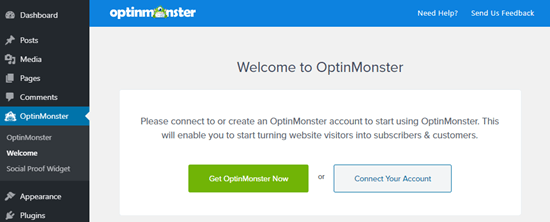
Install and Activate WPForms Plugin

First things first.

Install and activate the WPForms plugin on your WordPress site.

Once this is done, install and activate the ActiveCampaign addon on your site.

wpforms activecampaign integration

Once the installation is complete, the status of the Addon changes to Active.

ActiveCampaign WPForms Addon

You will be asked to enter the API URL and API key. Login to your ActiveCampaign account, and choose ‘My Settings’ which is below your profile name.

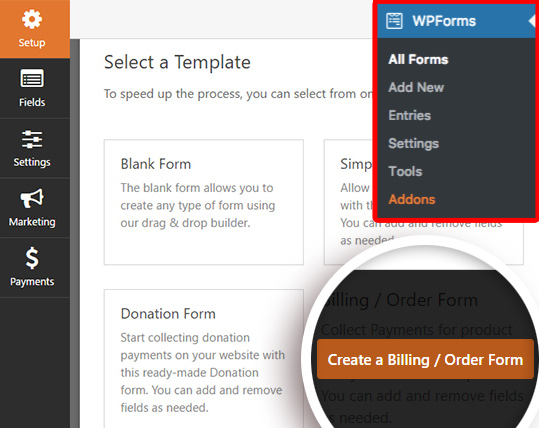
Create Your WPForms Forms

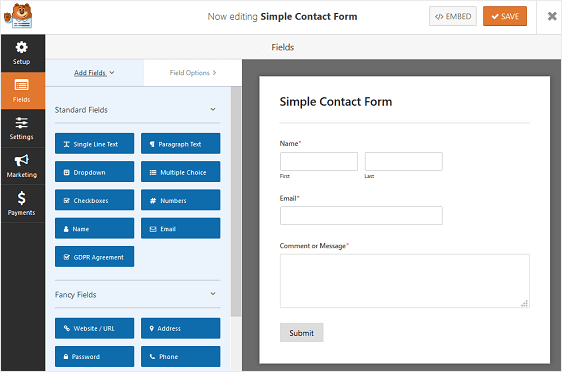
Once the activation is complete, it’s time to create a new form.

Go to WPForms and click on Add New.

Create WPForms Form

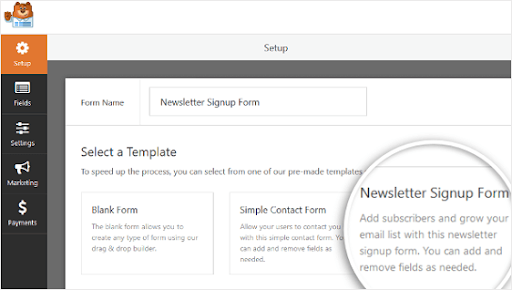
Name your form and choose any of the form types. In this example, you will be choosing the Newsletter Signup Form template.

The default Newsletter Signup template appears.

Create form using WPForms

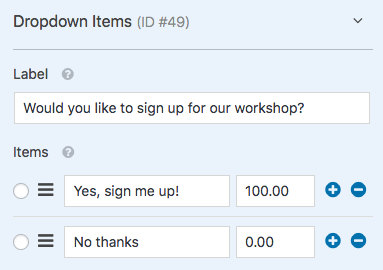
You can add, remove, or change positions of the fields in the form.

You can also add the GDPR Agreement Field to your form.

Let’s Integrate ActiveCamapaign & WPRocket

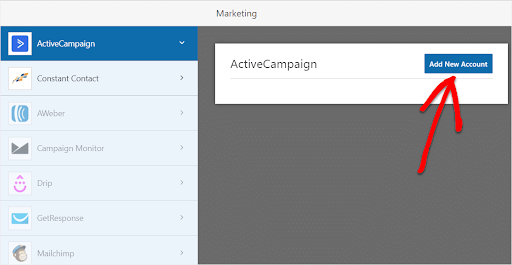
Click on the Marketing tab on the left and click on ActiveCampain (you need to install the ActiveCampaign addon. Please refer to step 1).

WPForms & ActiveCampaign Integration tab

Click on Add New Account.

ActiveCampaign Connection with WPRocket

In the next step (as shown below) you need to provide the ActiveCamapign API key details.

Add ActiveCampaign API to WPForms

To fetch the ActiveCampaign API URL and API Key, login to your ActiveCampaign account.

Now, go to the settings.

ActiveCampaign settings

From the menu coming up, click on Developer.

ActiveCampaign API Key details

From there, you can copy the API URL and API key.

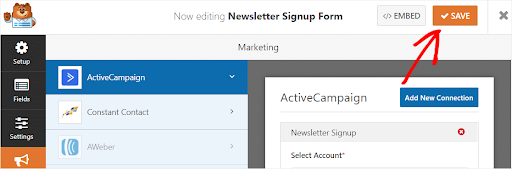
Once you fill in the fields, click on Add. Your WPForm is now connected to the ACtiveCampaign.

ActiveCampain Form Set Up

A popup will appear asking you to enter a nickname for the connection.

WPRocket ActiveCampaign Nickname

A window will appear with more settings.

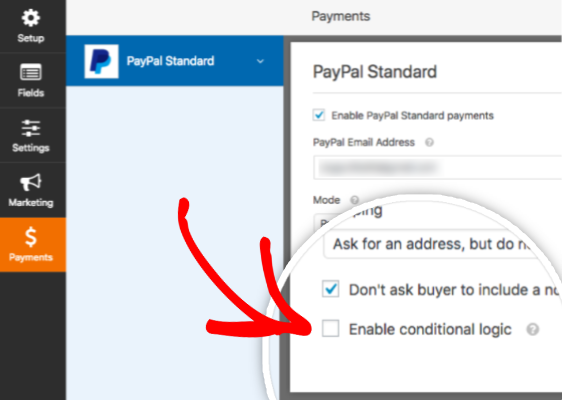
Choose the ActiveCampaign list & action to be performed from the next screen. You can also enable the condition login to route to different lists or actions based on the form submissions.

Choose ActiveCampaign list from WPRocket

Once done, Fill in all the details and click Save.

Add signup form

Add WPForms Form to Your WordPress Page

Open the WordPress page to which you are going to add the form.

Click on the first block and type in the WPForms search bar.

Click on the Add WPForms icon.

Choose the Newsletter Subscription Form.

After this, publish or update the page.

Add WPForms form to WordPress page

You have successfully integrated your WPForm with Active Campaign.

Filed Under: Wordpress

Crazy Easy Hacks to Boost WordPress Page Load Speed Score

May 18, 2021 by Technology Blog Leave a Comment

Speed of your website is important for user experience and for Google.

Optimising your website performance score (ie improving website page load speed) is the best SEO & UX strategy of this age, as studies shows that just 1-second delay in page load time can reduce conversions by almost 7%, and approx. 53% of your potential website visitors will leave the website if it takes more than 3 (yes, THREE) seconds to load.

Crazy isn’t it?

Why your SEO rankings will drop if the performance score is bad?

It’s simple! Google crawls the performance score of the website as a ranking factor, as well as if your website is not faster, people will leave your website immediately which causes high bounce rate- which is a ranking factor as well.

Alright! so the questions are, how do you know whether your website load faster or not and how to do a performance comparison with your competitors.

How to Check WordPress Website Speed Score

Below are the two most common and effective methods to audit your website performance score and to improve the same.

Method 1: Using WordPress Plugins (recommended)

The best and easiest way is to install one of the best WordPress speed optimization and analytics plugins such as MonsterInsights.

MonsterInsights helps you to run diagnosis as well as one-click fixes so that you won’t have to worry about how to fix the list of action items in the report. No coding skills required for any of the optimization steps!

Download MonsterInsights here

Method 2: Using Google Speed Insights

An alternate method is by using Google’s Speed Insights tool to audit the page load speed of the website and to optimise the same.

All you have to do is, just visit Page Speed Insights tool here and enter your domain name to analyse. You’ll get your page load speed score along with optimisation tips to improve the same.

However, you might need some level of coding skills to execute the same in WordPress.

WordPress Best Practises for Improved Page Load Speed

It is just a myth that WordPress website slow in general. Your WordPress website speed depends on a lot of factors including your website hosting, the plugins types and number of plugins used, images, external scripts and much more.

Using the below hacks, we’re sure you will see a high growth on the website speed score. Let’s dive in.

1. Select the Right WordPress Hosting

Choosing the right hosting provider is one of most important factor for the success of your WordPress website.

Most recommended to WordPress hosting providers are FastComet and BlueHost.

2. Use a Caching Plugin to Improve Response Time

The next high-impact WordPress optimization hack is to use a premium caching and files and database optimization plugin such as WPRocket. It helps reduce the load time of your website and improves the server response time.

Caching service providers temporary store frequenty visited pages and information which quickens your website speed. Also users may be accessing the most requested pages or information from their browser storage itself or from a copy of your website on your caching providers server so that such repeated visits may not load your server.

If you’re looking for a highly effective premium option, then we recommend using WP Rocket as it’s user-friendly, cache your website with a single click, and offers other features like image optimizations to speed up a WordPress website. WPRocket is effective as well.

Download WPRocket here

Free alternative is WP Super Cache, but you will lack of alot of features in free version.

3. Optimise Your WordPress Database frequently

The next WordPress speed optimisation strategy is by optimising your WordPress DataBase.

What is database? It’s a few numbers of tables in your hosting where data related to your WordPress are stored. Each time, WordPress goes to Database tables to find and retrieve requested information by your visitors.

Over time, your database might have stored a lot of temporary information and even tables that are no longer needed.

The easiest way of cleaning the database is by using the WP-Sweep WordPress plugin. It’s a free plugin, and you can clean up unused tags, trashed posts, revisions, auto drafts, and more.

4. Use Streaming Platforms for Videos & Audios

Hosting videos and audios directly on your WordPress takes a lot of your server bandwidth and causes lower website speed.

The simple fix is to use a streaming service such as YouTube or Vimeo for uploading videos and audios and embed them on your WordPress website.

We highly recommend using Vimeo as YouTube embed video has their branding as well shows related videos at the end from other people (maybe from your competitors as well) which may cause a conversion drop.

5. Use Industry Best WordPress Plugins

Make sure you’re using trusted and industry best plugins on your WordPress website as it is a fact that many plugins are not coded well, and not optimised for performance.

Also it is important to remove unused plugins and to reduce number of plugins used on your WordPress website. There may be a single plugin that may can replace two or three different plugins on your website.

Filed Under: SEO, Wordpress

How to connect WPForms and Sendinblue in WordPress

March 6, 2021 by Technology Blog Leave a Comment

In this article we are showing how to strategically connect two most powerful business tools- WPForms & SendInBlue.

If you are new to these two tools, let’s take a quick look at what makes these tools powerful and why you should use them to accelerate your online marketing game.

WPForms

As the name implies, WPForms is a WordPress form builder with powerful & most advanced capabilities such as drag-and-drop builder, beautiful templates, default responsiveness, smart condition logic, instant notifications, leads management, multi-page forms, file upload capability, payment gateway integration, user registration modules, free spam prevention & protection from bots, integration with automation and email tools, digital signature, form abandon followup, user journey mapping, and lot more… you name it!!!

Sign Up for WPForms here with latest offers.

Sendinblue

Sendinblue is the smartest and most intuitive email marketing and automation solution. Sendinblue helps you to:

  • Communicate
    • Email Marketing
    • SMS Marketing
    • Chat
  • Personalize
    • CRM
    • Marketing Automation
    • Transaction Email
    • Segmentation
  • Convert
    • Landing Pages
    • Signup Forms
    • Facebook Ads
  • Improve
    • Open & Click-through Reports
    • Email Heat Map
    • A/B Testing
    • Real-time Statistics
    • Send Time Optimization
  • Integrate
    • API
    • Plugins

So, I hope you got a better idea about WPForms & Sendinblue.

Let’s dig into the integrate of WPForms and Sendinblue to accelerate your marketing game.

Signup for SendInBlue with latest offers here

Install WPForms, Develop Form & Install Sendinblue addon

Before getting started, we need make sure that the WPForms plugin installed and the website forms are developed using WPForms.

Here’s how to create multi-page forms in WordPress using WPForms. You can use the same guide itself for developing simple forms as well.

Once you install the WPForms and created your first form, you’ll need to install and activate the addon of Sendinblue for WPForms:

  • Navigate to WPForms » Addons on your WordPress dashboard.
  • If you can’t see any addons, click Refresh Addons button to force a refresh.
  • Search for Sendinblue addon
  • Click on Install Addon and make sure the status is Active in green

Congratulations! You’re ready for the integration game.

WPForms & Sendinblue Integration

Once the Sendinblue addon is installed and activated on your WPForms, you are ready to connect your Sendinblue account with WPForms using their powerful API capabilities without writing any single line of code.

To do this, go to WPForms » Settings and click on the Integrations tab on your WordPress.

Then click on the Sendinblue option to expand its settings. And then you can click on Add New Account.

It will expand the Sendinblue API information fields to connect your account.

It’s easy to find this information from Sendinblue account. Once you’ve logged in to Sendinblue, click on the main menu (located on the top right corner of the page) and select SMTP & API option.

You can see your API information here.

Go ahead copy the API code and install it on your WPForms field.

Then you can put any name on the Nickname field to identify this account correctly. This is an important step if you have multiple Sendinblue accounts to be connected with WPForms.

Once you’re ready, go ahead and click on the Connect to Sendinblue button.

WPForms will now connect to your Sendinblue account, and once the connection in successful it will show a green Connected status.

Adding Sendinblue integration to WPForms form

Once you’ve successfully connected your Sendinblue account, it’s time to add Sendinblue integration to your forms.

Please note: You’ll need to do this step for each forms individually to get thenm connected to Sendinblue.

Open your form, and within the form builder, go to Marketing » Sendinblue. Then, in the Sendinblue tab, click on the Add New Connection button.

You will be prompted to provide a nickname for this connection. You can enter anything here as it is just for internal purpose only.

If you’ve more than one Sendinblue account connected to WPForms, you need to select appropriate Sendinblue account from the Select Account drop down.

Then, under Action to Perform, select the action you’d like to happen when users submit your form. For our example, we’ll select Subscribe to add users to our Sendinblue contacts.

Once you have selected to the action to perform, additional settings will be enabled for you to configure the field mapping.

See below to know more about each field here:

  • Email:* Select the WPForms field that will contain the subscriber’s email address.
  • New Email: Select the WPForms field that would contain the new email address of the subscriber. This field is only necessary when updating an existing contact in Sendinblue, so for our example, we’ll leave this field blank.
  • List:* Select the Sendinblue list that you’d like the subscriber to be added to.

If you’ve custom fields to be integrated, you can do the same under the Custom Field Name section.

Once you’ve done all this settings and configuration, be sure to save the form.

That’s it, sparkyyy! We just integrated your WPForms WordPress form with Sendinblue.

Do you have any questions? feel free to drop us a comment below and we’ll get back to you as soon as possible.

Filed Under: Wordpress

How to Quickly Create Exit Popups for WooCommerce

September 26, 2020 by Technology Blog Leave a Comment

Are you running an eCommerce store on WooCommerce powered by WordPress?

If yes, we’ve exciting magic recipe for you which helps you to increase your WooCommerce store conversions.

And, the magic is Lightbox popups!

Lightboxes allows you to easily grab the attention of your visitor and to lead them into sales, especially when your prospect is about to the website.

Thinking how?

The Lightbox popups can be a coupon code, latest offer, to promote a special product to collect their contact information such as name, email address etc. which can be used for retargeting and email marketing campaigns.

Imagine you are going to make an order for a product, but going to leave the store maybe because thought purchasing the product later or price concerns, and when you move you were about to close the website, a cool popup appears which just asks your email address to send your exclusive 10% offer coupon code.

How exciting it is? You might request the coupon code by entering your email address and soon end up with purchasing the product.

I hear you– Thinking about the developer effort and other factors while creating this technology?

The good news is you don’t need to reinvent the wheel again or even doesn’t need to use your developer resource to make these kinds of popups.

Let us show you how easy it is to create conversion boosting popups inside your WooCommerce without writing a single line of code.

You heard it right, and also you can connect these popups with your favourite CRM or email marketing tools such as ActiveCampaign, Keap, etc.

Alright, so let us show you how to create you first WooCommerce popup.

How to Create Exit Popups in WooCommerce

First, we need to have an active on OptinMonster account and it should be connected to your WordPress. You can create your OptinMonster account here.

Once you created your OptinMonster account, you need to connect it with your WordPress. It’s pretty simple. Just install & active the OptinMonster plugin on your WordPress and then click on connect your account button.

Connect OptinMonster Account

Once the OptinMonster plugin is activated, you can just follow the on-screen instructions to create your WooCommerce popup without writing a single line code.

Filed Under: Wordpress

[Step-by-Step] Create Multi-Page Forms in WordPress

August 23, 2020 by Technology Blog Leave a Comment

In this article, we’ll guide you to create your first multi-page form in your WordPress blog or website without writing a single line of code.

What is a Multi-Page Forms?

It’s just breaking your long forms into multiple pages/ steps so that users will be seeing only a few simple questions so that the conversion can be improved. And the beautiful benefit or multi-pages forms is, you can use conditional logics to show different questions based on their previous answers.

Excited? Let’s see how we can create your first multi-step WordPress form

How to Create Multi-Step WordPress Form

Video Guide

Step-by-Step Guide

Step 1: Create your form in WordPress

The first step is to create your WordPress form using a form builder. We need to choose a builder which supports multi-page feature for this step.

In this example, we’re using a WordPress form builder- WPForms which is the best WordPress form builder in market.

So, let’s install and activate WPForm builder.

Next, go to WPForms » Add New in your WordPress dashboard to create a new form.

Name the form on setup screen and choose a template. Here we’re choosing a simple template.

you can start building your form by choosing a template and adding additional questions (we’ll convert this long form into multi-step form later) in fields section.

Needs to accept payments on your WordPress form? Learn more.

Step 2: Split Your Form into Multi-Steps

Once your form is ready with fields, you need to add the Page Break form field to where you need to split your form.

To do this, you can just drag the Page Break form field in Fancy Fields section and drop to in between your form (see the image below).

Repeat this step to split your form as much as you need. WPForms will write the complex codes on behalf of you to make the multi-pages form functional.

Step 3: Customize the Progress Bar on Your WordPress Form

It is recommended to add a progress bar as well on your forms to let your prospects know different sections of your form.

Using a process bar, they’ll know where they are on your WordPress form and how much they have to fill to complete form– This is important for improving conversion rate. To make this super easy for you, WPForms has built-in breadcrumb bars as below:

You can easily customize progress bars and page titles by simply clicking on each page break fields.

You’ll see be below customization options:

Then click on the ‘Next‘ button, and you can customize the button and title of next page.

On this page, you can click on the ‘Previous‘ button and customize it as well.

Click Save once your complete customizing all your pages and buttons.

Step 4: Configure Form Settings

Now you’ve design of the form with multi-step feature enabled. The next is to configure your form settings to customize it’s behaviour and submission actions.

Go to Settings -> General

On this screen, you can configure the following:

  • Form Name — Change the name of your form to identify later
  • Form Description — Give your form a description
  • Submit Button Text — Customize the copy on the submit button- Studies says that the conversion will be improved if you use action verbs on your button
  • Spam Prevention — This section helps you to enable anti-spam protections to stop bots auto submitting on your form. You can also refer how to enable Google reCAPTCHA on your form here
  • AJAX Forms — Enable AJAX settings with no page reload for improving page load speed
  • GDPR Enhancements — You can disable the storing of entry information and user details, such as IP addresses and user agents. This is mandatory in EU countries

Click ‘Save‘ once you’re done!

Step 5: Configure Your Form’s Notifications

You can setup an email notification when someone submit the form.

Go to Settings -> Notifications.

Step 6: Customize Your Form’s Confirmations

On settings -> Customizations section, you can update the POST form submission confirmation action. There’re three type of confirmations are supported by WPForms:

  • Message: This is the default confirmation type. A simple confirmation message will appear instead of field letting them know their submission is sent successfully. This confirmation type won’t redirect from your current page.
  • Show Page: This confirmation type will show a specific page on your WordPress once the submission is successful. This type is recommended if you are planning to WordPress page itself as thank you page
  • Go to URL (Redirect): Use this type if you want to redirect prospect another website after submitting the form

Step 7: Add Your Form to Your Website

Awesome!

Now your multi-step form is ready to embed on pages as per your requirements.

On the edit window of pages you can see ‘Add WPForm icon’.

Just click on it and choose the form you would like to add on that page.

Conclusion

That’s it! You’re created your multi-step form successfully.

What’s next? Let’s learn how to integrate your WPForms with your email autoresponded tool such as ActiveCampaign or MailChimp.

Filed Under: Wordpress

How to Easily Boost Your Email List with Content Locking

August 19, 2020 by Technology Blog Leave a Comment

Do you want to add content locking on your blog or website? Content locking is one of the most powerful and proven email list building tactics to skyrocket your lead generation.

In this article, we’ll help you to create content locking on your website without writing a single line of code. Yes, you heard right.

What is Content Locking?

Content locking is an email list building tactic used by marketers to skyrocket email lists without compromising the quality of leads. It forces the reader to do an action (generally opt-in form submission) for getting access to protected content.

As you can see on the image above, the ‘list of events’ is blurred behind the signup box. Once the reader put their details the opt-in box will disappear and they can read the content clearly.

It is recommended to lock only high-value content like a list of hacks, eBook download link or access to a FREE course. In the example above, the website owner put the content lock inside an article which hide the download link of ‘events list’.

Got it?

Awesome! Now you understood what is content lock and how to use it strategically. If you have any questions, just comment below and one of our experts will help you with more details.

What you do need to setup content locking in WordPress?

In this tutorial, we’ll be using a powerful tool OptinMonster to create content locks on your website.

OptinMonster also provides a lot of other lead generation widgets as well that can be used on your website with integration to your CRM platforms without writing a single line of code.

Video tutorial

How to setup Content Locking?

First thing first:

  • Create an account in OptinMonster
  • Choose one of the templates
  • Customize the widget to match your brand guidelines
  • In the settings, enable the option ‘Lock Content Below Campaign?’
  • You can use this widget on your website directly. OptinMonster support almost all the CMS platforms including WordPress
  • You can also connect the opt-in form with your email marketing tool such as ActiveCampaign

That’s. You’re done! Start skyrocketing your email list.

Filed Under: Wordpress

How to Create Online Donation Forms for Nonprofits

May 31, 2020 by Technology Blog Leave a Comment

Creating non-profit donation forms in WordPress is easier than ever.

In this article, we’ll show you how to create online donation forms through simple and easy steps.

Step 1: Creating Your WordPress Form

The first thing to do is to install and activate the WPForms plugin. WPForms is a freemium plugins which helps you to create beautiful WordPress forms in minutes with writing a single line of code.

Once this is done, next go to WPForms and Add New to create a new form.

Here, name your first form and choose the donation form template.

The default donation form will appear.

Step 2: WPForm Customization

The default fields like name, email, donation amount, and message will be present on the template.

Additional fields can be chosen from the list on the left-hand side and can be dragged to the form to place it there.

Once you are done editing the form, click on the Save button on the top right to save the changes made.

Step 3: Configuring the Form’s General Settings

We’ve to configure certain settings while creating a non-profit WPForm. 

We are beginning with the general settings.

Go to the Settings and then General.

You can customize many things here like your form’s name, form description and even the submit button text.

Step 4: Configure the Form’s Notifications and Confirmations

You will be notified about the donations made unless you turn off this feature.

The site visitors will be delivered a message once they submit a donation form on your website.

You can choose from the three donation confirmations which will let the visitor know about the next steps – Message, Show Page, and Go to URL.

Step 5: Setting up the Payment Method

Configuring the payment settings is mandatory to receive donations through WPForms.

WPForms can be integrated with both PayPal or Stripe to receive payments.

Install and activate the addon for the payment platform that your wish to integrate with the WPForms.

Once this is done, choose the payment tab in the form editor.

In this example, we’re choosing PayPal as our payment platform.

Additional settings will appear.

Once you’ve made the edits and added the details, click Save.

Step 6: Adding the non-profit form to the Website

Choose the page from WordPress on which you’d like to insert the donation form and click on Add Form.

There!

Your non-profit donation forms will appear on the website immediately.

Filed Under: Wordpress

How to Boost Your Conversions using Exit-Intent

May 12, 2020 by Technology Blog Leave a Comment

The truth is, 70% of your website/ blog visitors will leave you without literally doing anything on your website.

And, I know how hard you worked to drive your visitors to your website, whether it is SEO, social media, or paid channels.

I heard from you!

So in this article, I’m introducing you to an advanced tactic- Exit popup implementation.

We use an online tool called OptinMonster for this implementing exit-intent popups.

Use this coupon code ‘KID‘ for 30% off on your purchase! A portion of your money will be donated to No Kids Hungry charity.

How does It work?

The exit-intent feature will retain your visitor on your website by providing them with engaging content.

When a user is scrolling up your website to find the address bar it is an indication that he/she is not interested in the content anymore.

This is when the low or medium sensitivity comes into action.

The exit-intent gives a message with great content.

Let’s look up a different scenario.

What if the user just clicks the back button instead of scrolling up.

Here, exit-intent sensitivity is high.

So you should choose the sensitivity as High.

The pop-up will show offers or discounts which the user might find interesting and make them want to remain on your site for even longer.

With the help of exit-intent and proper content, you can boost your conversions and bring up your sales.

OptinMonster also has unique templates for the pop-up messages which are to appear upon triggering the action.

This is an example of the template ‘Donate’.

There are different templates available in catching designs to increase customer retention rates and the number of leads.

What is more?

The templates are also customizable.

You can edit the content and add the content you wish that your users should see before leaving your website forever.

With the exit-intent feature from OptinMonster, boost your sales and increase your lead 2-4%.

Filed Under: Wordpress

How to Collect PayPal Payments on Your WordPress Site

May 1, 2020 by Technology Blog Leave a Comment

Now you can collect PayPal payments through your WordPress website forms.

WPForms will allow you to accept payments by integrating PayPal into it.

Let’s see how to get it done in simple and easy steps.

Step 1: Installing PayPal Addon and Form Creation

Install and activate WPForms as well as PayPal addon s on to your WordPress website.

Once this is done, we’re going to add PayPal in your WPForms.

For this, first, you have to create a form.

In this example, we are creating a billing/order form.

The form appears with the default fields.

PayPal needs only a single field to work properly with WPForms.

Step 2: Add PayPal to the Form

Now let’s connect PayPal to your form.

Go to the Payments section and then PayPal Standard.

Check the ‘Enable PayPal Standard payments’ box.

You can fill in the remaining boxes and once you are ready, click on the ‘Save’ button to save the payment details.

Step 3: Set Up Conditional Logic

The conditional logic is a smart Form which changes the options on your forms based on the user’s selection.

To begin with, open the form builder, go to payments and then PayPal standard.

Tick the box labelled ‘Enable Conditional Logic’.

Now a set fo additional boxes will appear and you can decide when the user should be sent to PayPal to complete the payment process by filling in the details.

For example, you only need to send users to the Paypal only if they are willing to signup for the workshop.

For this, you will have to add a drop-down asking whether they would like to signup and allow them to choose from the options.

The users will only be taken to Paypal only if they would like to sign up for the workshop. 

This way you can condition your WPForm.

Step 4: Test your Form

You can test your WPForm by running a test entry by pretending to be a user.

Going all the way till the PayPal option and carrying out a small transaction is also highly recommended to ensure everything is working well.

Filed Under: Wordpress

5 Best WordPress Affiliate Marketing WordPress Themes of 2020

November 16, 2016 by Technology Blog Leave a Comment

Building a WordPress website and using the same to earn from it with Adsense and affiliate links is one of the excellent ways to produce passive income through the web. Since the commencement of Internet, Affiliate marketing has been a great approach, and a lot of people practice it to earn bucks by developing niche websites encompassing topics and then getting appropriate affiliate partners and also by putting Google Adsense blocks on the site where they get paid for every click received on any of the ads.

While you can put these profits producing affiliate links on any WordPress site and theme, picking a theme which is created especially for this idea serves plenty of benefits. One obvious attribute of these WordPress affiliate themes is that simplifies the publishing of professionally appearing reviews. WordPress is free and requires simple working and operating and by practicing one of these WordPress Affiliate Themes you can have your earning-generating website.

Genesis Framework

The Genesis theme is a friendly, spontaneous WordPress theme which lets any webmaster whether be amateur or proficient promptly and smoothly develop a website with a professional display design. Download Genesis Framework Here with Discounts

To implement the Genesis Framework theme Minimal WordPress skills are required on any website, and you have a plenty of tools and options to customize the look and feel of your developing site to meet the expectations. Promptly equipping your WordPress website with multimedia content skills, attached editorial, tabbed web pages, simple formatting tools, and even responsive design, Genesis is the theme where a great customized WordPress Development begin.

REHub

REHub comes with plenty of product display relevant features, definitely making easy to add reviews, product comparisons, and other product displaying characteristics to your WordPress website. REHub is a great choice; no matter you are using it for featuring products on a serious affiliate basis, or for selling your items from the website.

Download ReHib

SteadyIncome

The WordPress theme SteadyIncome is primarily designed for developing websites which monetize through affiliate plans. The theme is created by MyThemeShop team, which guarantees it for one of the swiftest loading themes. With the quick loading WordPress website, picking the SteadyIncome theme enables you to get availability to a rich set of features that helps you earn more on the web. These attributes are a tool for building an email list, product displays, smart and appealing social media icons, and complete mobile responsive design.

Compare

The WordPress theme is an excellent pick for anyone who requires professional and corporate appearance, possibly for aiming the B2B audience. With the full-width plan and design of Compare WordPress theme, you receive a plethora of screens when it is about adding the content. With the advanced features of Compare, you get lots of possibilities for adding the product description to your website.

Rethink

Rethink WordPress theme comes with some remarkable new features to help you create the ideal affiliate website. Amongst the plenty of its notable features of this WordPress theme, you get several useful tools for posting the product and service feedbacks. As well as helping you to publish professional looking reviews, the With Rethink WordPress you can easily arrange different products on your site. The advantage of this is that it helps your visitors find what they are searching, again boosting the earning chances.

Conclusion

Affiliate marketing unquestionably is one of the best income generating models for online businesses, eCommerce, and many bloggers. The only thing you need to focus is on developing quality rich content and thorough, fair product reviews to earn some clean-cut revenue.

Filed Under: SEO, Blogging, Wordpress

Primary Sidebar

Copyright © 2025 TechieFeeds.com